
Feature of Duplicate Photo Finder Plus - Flexible Sources: Drive(s), Folder(s), Files and Type(s)
Go to Product Homepage >>>
On the main interface of duplicate photo searcher, you can specify the searching source as your needs: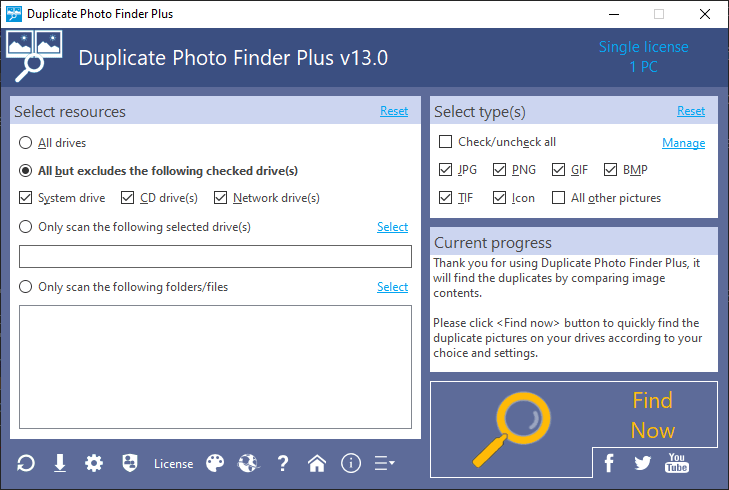
Screenshot A: our photo duplicate finder for removing duplicate photos.
"Select resources" area on the left: used to specify the drives, folders and / or files to scan.
"All drives": all files in all drives of your computer will be scanned (except the excluded folders/files that set on the option interface)."All but excludes the following checked drive(s)": will scan all the drives except the checked drive(s) under this option, and these three types of drives will be excluded by default. Because 1. removing the files in the "system drive" may damage the system. 2. the "CD drive(s)" are generally read-only, even if they are readable and writable, the CD is used to back up data in general, so that is unnecessary and maybe impossible to remove the resources on them. 3. in Windows, a "network drive" is generally a mapped path on the server or other computers, it is generally read-only. Even if it can be read and written, that is inconvenient to remove other computer resources without authorization.
"Only scan the following selected drive(s)": when you are sure that most of the duplicate photos are stored in some drives, using this option can save a lot of scanning time.
"Only scan the following folders/files": it's your first choice when you are sure that most of the duplicate photos are stored in some folders. In addition, you can also individually specify several suspected duplicate photos for targeted comparison.
"Select type(s)" area on the right: used to specify the picture types to be compared.
We have separately listed the most common image types such as JPG, PNG, GIF, BMP, TIF and Icon, and only these 6 types are checked by default, this can meet the needs of most users.If you have other picture types to compare, just check "All other pictures", it contains more than thousand of other types, you can click the "Manage" link in this area to view or add.
At last, there are "Reset" links beside these two scan source areas, if you are not satisfied with the settings, you can reset them and then adjust. You can also click the "Reset" button (circle icon with arrow) at the bottom of the main interface to reset all above conditions.
After set properly, check the options (gear button at the bottom of the main interface) and then click "Find now".
In fact, for normal users, do not need to adjust the scanning sources and options, we have set the default settings according to the most common application scenarios. After the software is launched, directly click the "Find now" button to get the list of duplicate pictures as you want.
 Start experiencing our powerful photo duplicate finder!
